Close Menu
Homemade Skincare Recipes and Beauty Tips
    Pinterest
    Trending
    • DIY Rosemary Water Hair Rinse
    • Brown Sugar & Coconut Oil Scrub
    • Oatmeal & Yogurt Soothing Scrub
    • Turmeric & Rice Flour Scrub for Dark Spots
    • Coffee & Sugar Scrub Recipe at Home
    • DIY Lemon & Honey Body Scrub for Bright Skin
    • How to Do a Skincare Patch Test
    • How to Make Rice Water Rinse for Hair Growth
    • About Us
    • Contact Us
    • Disclaimer
    • Privacy Policy
    • Terms
    Homemade Skincare Recipes and Beauty Tips
    • Home
    • DIY Body Scrub Recipes
    • DIY Face Mask Recipes
    • DIY Body Butter Recipes
    • DIY Hair Growth Recipes
    • DIY Lip Balm Recipes
    Homemade Skincare Recipes and Beauty Tips
    Home»Homemade Skin Care Recipes»Need A Quick Fix For Dry Skin? Make This Simple Scrub
    Homemade Skin Care Recipes

    Need A Quick Fix For Dry Skin? Make This Simple Scrub

    HersheyBy HersheyJanuary 12, 2022No Comments6 Mins Read
    Facebook Twitter Pinterest LinkedIn Tumblr Email
    Share
    Facebook Twitter LinkedIn Pinterest Email

    For those struggling with dry skin, a coconut oil, Epsom salt, and lavender oil scrub offers a refreshing solution. This simple recipe not only exfoliates but also nourishes the skin, leaving it soft and hydrated. With the soothing properties of lavender and the moisturizing benefits of coconut oil, this scrub transforms a basic skincare routine into a spa-like experience at home.

    a coconut oil, Epsom salt, and lavender oil scrub

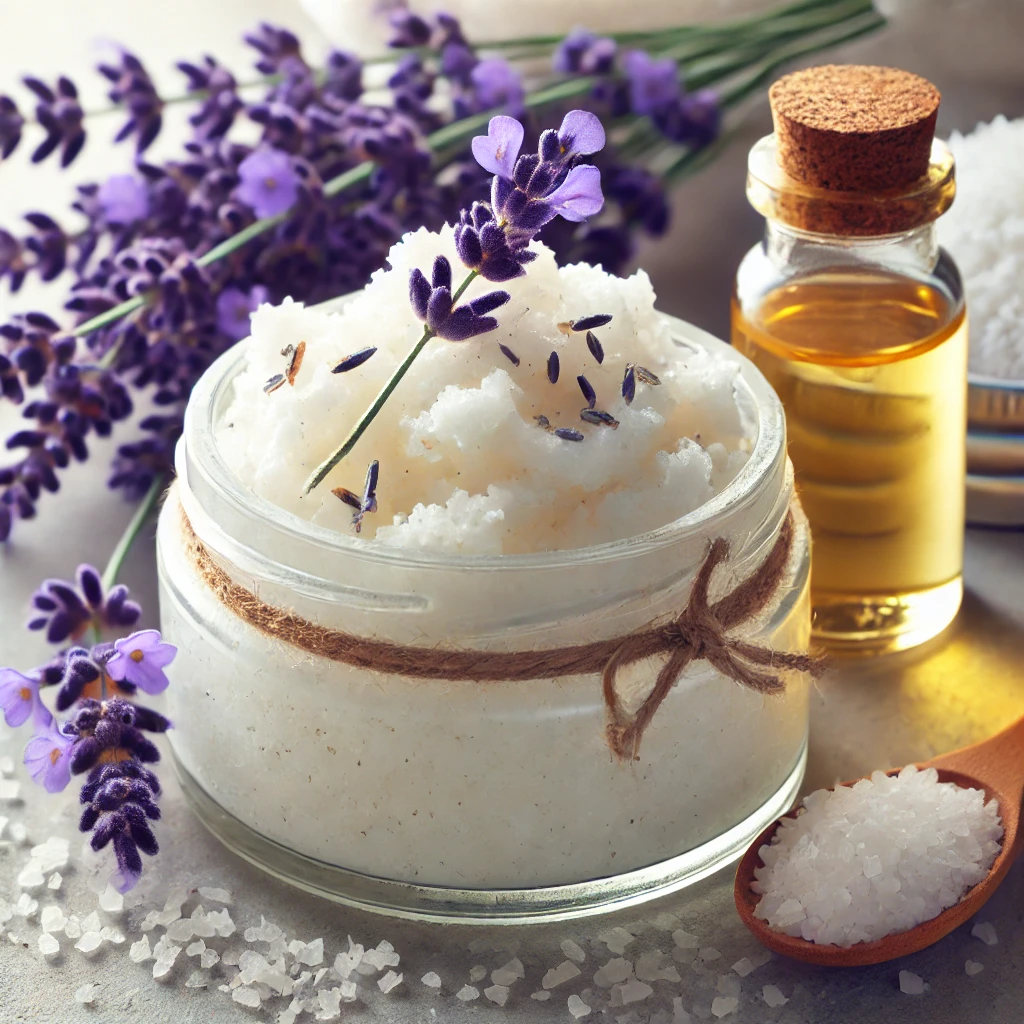
    Crafting this skin scrub is straightforward and requires just a few key ingredients. By combining Epsom salt with melted coconut oil and a few drops of lavender essential oil, anyone can create an effective and aromatic remedy for dry skin. The gentle exfoliation helps to remove dead skin cells while the oils work together to replenish moisture.

    In addition to its effectiveness, this scrub can be tailored to personal preferences. Different essential oils can be swapped in for lavender, while the ratio of ingredients can be adjusted for varying skin needs. Whether it’s a self-care treat or a thoughtful gift, this scrub is sure to impress and provide lasting benefits.

    Recipe Components

    This section explores the key ingredients used in the coconut oil, Epsom salt, and lavender oil skin scrub. Each component offers specific benefits that contribute to alleviating dry skin, making it essential to understand their properties and advantages.

    Coconut Oil Benefits

    Coconut oil is widely recognized for its moisturizing properties. It contains medium-chain fatty acids, which penetrate the skin deeply, providing hydration and nourishment. This oil helps to create a protective barrier on the skin, effectively reducing moisture loss.

    Additionally, coconut oil has anti-inflammatory properties. This can aid in calming irritated skin and promoting a healthier complexion. It is also rich in antioxidants, which help fight free radicals, contributing to overall skin health.

    Moreover, the soothing texture of coconut oil makes it an excellent carrier for other essential oils. Its gentle nature ensures compatibility with various skin types, adding to its appeal as a prime ingredient in skincare recipes.

    Epsom Salt Properties

    Epsom salt, scientifically known as magnesium sulfate, has properties that promote relaxation and skin health. When used in scrubs, it acts as an exfoliant, helping to remove dead skin cells, which is crucial for people dealing with dryness.

    The magnesium content in Epsom salt can soothe muscle tension and reduce inflammation. This additional benefit makes the scrub not just a skincare solution but also a relaxing treatment for the body.

    Furthermore, Epsom salt aids in drawing out impurities from the skin, which can lead to a clearer complexion. Its combination of physical exfoliation and therapeutic minerals helps to improve overall skin texture and health.

    Lavender Oil Advantages

    Lavender oil is a popular essential oil known for its calming fragrance and skin benefits. It possesses anti-inflammatory properties that can help reduce redness and irritation, making it ideal for sensitive skin.

    In addition to its soothing effects, lavender oil is an antimicrobial agent. This can assist in preventing minor skin infections and promoting healing. Its ability to balance oil production also makes it suitable for various skin types.

    The comforting aroma of lavender oil offers emotional benefits, further enhancing the overall experience of using the scrub. Its fragrance can help reduce stress and promote relaxation, making bath or skincare routines more enjoyable.

    Preparation and Application

    A wooden bowl filled with coconut oil, epsom salt, and lavender oil, surrounded by dried lavender and coconut shells

    Creating a coconut oil, Epsom salt, and lavender oil scrub is straightforward. Proper mixing, application, and storage are essential for achieving the best benefits while ensuring the scrub remains effective.

    Mixing Instructions

    To prepare the scrub, gather the following ingredients:

    • 1 cup Epsom salt
    • 1 cup sea salt
    • 1/2 cup coconut oil (melted)
    • 20 drops lavender essential oil

    First, melt the coconut oil in a microwave or double boiler until it becomes liquid. In a medium bowl, combine the Epsom salt and sea salt. Gradually pour the melted coconut oil into the salt mixture while stirring continuously. This ensures an even distribution of oil throughout the salts. Finally, add the lavender essential oil and mix thoroughly until all ingredients are well incorporated. The mixture should have a fluffy consistency that holds together.

    Application Guidelines

    For optimal benefits, apply the scrub in the shower or bath. Start by wetting the skin to prepare it for exfoliation. Take a handful of the scrub and gently massage it onto the skin in circular motions. Pay special attention to dry areas, such as elbows, knees, and feet.

    Avoid using the scrub on irritated or broken skin. Use the product for about 5-10 minutes, allowing the ingredients to nourish the skin. Rinse off with warm water, and feel the difference in softness and hydration. For best results, limit usage to 1-2 times per week.

    Storage and Shelf Life

    Store the scrub in an airtight container to maintain its freshness and effectiveness. A glass jar with a tight-fitting lid is ideal. Keep the container in a cool, dry place away from direct sunlight to prevent the oils from becoming rancid.

    The shelf life of the scrub is approximately 6 months. If the mixture changes in scent or consistency, it’s best to discard it. Always use a clean spoon or spatula to scoop out the amount needed, avoiding contamination. This practice helps extend the scrub’s shelf life and maintain its quality.

    Frequently Asked Questions

    A glass jar filled with coconut oil, epsom salt, and lavender oil, surrounded by loose ingredients and a wooden spoon

    This section addresses common inquiries regarding the coconut oil, Epsom salt, and lavender oil skin scrub. The benefits, optimal ratios for mixing, and application techniques will be discussed in detail.

    What are the benefits of using a coconut oil, epsom salt, and lavender oil skin scrub for dry skin?

    Coconut oil is known for its deep moisturizing properties, which help hydrate and soften dry skin. Epsom salt may assist in exfoliating dead skin cells, promoting a smoother texture. Lavender oil not only adds a pleasant fragrance but also provides calming effects, aiding in skin irritation reduction.

    What is the best ratio of coconut oil to epsom salt for a moisturizing skin scrub?

    A common ratio for an effective scrub is 1 part coconut oil to 2 parts Epsom salt. This balance maintains adequate moisture while ensuring proper exfoliation. Adjustments can be made based on personal preference for texture and consistency.

    Are there any specific techniques to apply a coconut oil and lavender oil scrub for maximum benefit?

    Applying the scrub in gentle circular motions enhances exfoliation and stimulates circulation. It is beneficial to use the scrub on damp skin, as this can help the oils absorb better. Rinsing thoroughly afterward will leave skin feeling soft and nourished without residue.

    We are on YouTube
    How to Make Your Skin GLOW with 3 Ingredients

✨ DIY Carrot Glow Cream Recipe
This recipe is designed to infuse your skin with the antioxidant power of carrots (beta-carotene) using just three core ingredients, as seen in your video.

🥕 Ingredients
Fresh Carrots (Grated)
Coconut Oil (For the oil infusion)
Aloe Vera Gel (For the cream base)

👩‍🍳 Step-by-Step Instructions
Roast the Carrots (Maximize Potency): Gently roast or dry the grated fresh carrots. This step helps to intensify and make the beta-carotene more accessible for extraction.

Infuse the Oil (Extract the Goodness): Place the roasted/dried carrots into a clean jar and cover them completely with coconut oil. Seal the jar and allow it to infuse, ideally overnight or longer, to extract the powerful antioxidants into the oil.

Strain the Oil (The Foundation): Carefully strain the oil mixture into a clean jar, separating the liquid (carrot oil) from the solids. This golden liquid is the foundation of your cream.

Create the Cream Base (Mix the Magic): Start with a dollop of pure aloe vera gel in a bowl.

Whisk and Transform: Slowly add the precise amount of your homemade carrot-infused oil to the aloe vera gel. Whisk the two ingredients together until they instantly transform into a smooth, vibrant orange cream.

🌟 Benefits
Vitamin A/Beta-Carotene: Carrots are rich in beta-carotene, a precursor to Vitamin A, which is known for promoting skin renewal and a healthy glow.

Moisture Lock: The combination of coconut oil and aloe vera helps to deeply hydrate and lock in moisture.

*Disclaimer: Always do a patch test before applying new products, especially DIY recipes, to your skin.*


Watch as we make a luxurious DIY carrot cream for a healthy, radiant complexion! This skincare diy uses natural ingredients to create a homemade skincare solution that's perfect for face care. We'll show you how to get glowing skin with this simple homemade recipes for a carrot body butter.
    I Made a Carrot Cream and My Skin Glows Now #skincare #natural #diy
    Watch how she transforms an empty Tree Hut Sugar Scrub jar into a viral DIY! 🤯 She didn't throw out her old jar—she refilled it from scratch with a homemade body scrub that looks even better than the original.

This DIY Tree Hut Scrub dupe is perfect for anyone looking for a skincare hack to save money and customize their exfoliation.

Ingredients used in the video:

Sugar
Ground Coffee
Body Wash (for a creamy base!)
Honey
Coconut Oil

Have you ever tried making your own body scrub? Let us know your favorite DIY skincare recipes in the comments!

#TreeHut #BodyScrub #DIYSkincare #SkincareHacks #TreeHutDupe #HomemadeScrub #BeautyHacks #Exfoliation #SelfCare #SugarScrub #YouTubeShorts #DIYBeauty

Watch as she creates a luxurious "homemade sugar scrub" right from her kitchen, reusing an old container. This "diy body scrub" combines simple ingredients for a fraction of the cost of store-bought versions, making it an ideal "body scrub at home". With this easy "sugar scrub for body", you can achieve incredibly smooth skin. It's a fantastic "diy projects" that shows you "how to make your skin smooth" naturally.
    Homemade Body Scrub That Looks Even Better Than Tree Hut #skincare
    DIY Moong Dal & Aloe Vera Face Mask for INSTANT GLOW! ✨

You won't believe the secret ingredient for **glowing skin**—it's **LENTILS** (specifically moong dal)! 🤯 Watch this quick DIY to see how she transformed simple kitchen ingredients into a powerful **natural face mask** for instant brightness.

In this short, she blended fine moong dal (split yellow lentils) into a powder, mixed it with soothing aloe vera gel, and a splash of water to create a creamy, natural beauty paste. This is your new go-to homemade glow mask!

**How to Use for Best Results:**
* Apply the mask evenly to your face.
* Leave it on for just **20 minutes**.
* Rinse thoroughly with **cold water** to close pores and lock in the brightness.

This quick DIY skincare hack uses traditional Indian beauty secrets (Ayurveda-inspired) to give you soft, bright, and glowing skin without harsh chemicals. Perfect for those looking for natural skincare routines and affordable beauty tips.

What do you think of this amazing hack? Let me know in the comments if you’ve tried a lentil mask before! 👇
👉 Like this video if you love natural beauty tips!
🔔 Subscribe for more easy DIYs and skincare hacks!

#diybeauty #skincarehacks #naturalbeauty #glowingskin #indianbeauty #moongdal #facepack #homemadefacemask #skincaretips #selfcare
    I Tried a DIY Lentil Face Mask and WOW! #skincare
    The #1 Natural Face Mask For Glowing Skin! ❤️ DIY Anti-Aging Recipe

Want brighter, younger-looking skin without expensive serums? This viral DIY face mask uses a surprisingly powerful ingredient: banana peels!

Watch the full short to learn how to make this simple, all-natural anti-aging remedy that also brightens and adds a gorgeous glow to your skin.

The 7-Day Challenge: Apply this mask every day for one week to see amazing results. It's packed with vitamins and antioxidants to help reduce the appearance of fine lines, wrinkles, and dark spots.

DIY Banana Peel Face Mask Recipe
What You'll Need:

1 Banana peel
2 tablespoons rice
200 ml of water
1 tablespoon milk powder
1 tablespoon cornstarch
1 tablespoon lemon juice

Instructions & Storage:

Boil the banana peel and rice in water until soft.

Blend the mixture until smooth.

Stir in the milk powder, cornstarch, and lemon juice.

Store in an airtight container in the refrigerator for up to 7 days.

👍 If you loved this natural skincare hack, hit the LIKE button and SUBSCRIBE for more easy DIY beauty recipes!

#DIYfaceMask #BananaPeelMask #AntiAgingMask #GlowingSkinHack #NaturalSkincare #RiceMask #DIYBeauty #YouTubeShorts #SkincareRoutine #WrinkleTreatment
    The #1 Natural Face Mask for Glowing Skin! ❤️ DIY Anti-Aging Recipe #skincare
    How to Make DIY Korean Flaxseed Mask for Skin Whitening (Natural Botox Effect!) 

Get the viral **"Natural Botox"** effect at home with this simple **DIY Korean flaxseed mask** recipe! This homemade treatment is famous for making skin look tighter, brighter, and deeply hydrated.

This short video shows you exactly how to make the best flaxseed gel mask using a simple addition—rice flour—for a powerful skin whitening and glass skin effect.

### ✨ Why this Mask Works:
* **Flaxseed Gel:** Rich in Omega-3s and antioxidants, it provides incredible hydration and creates a visible, temporary lift/tightening effect as it dries.
* **Rice Flour:** A key ingredient in Korean and Japanese skincare, known for its gentle brightening and skin-softening properties.

### 📋 Full Recipe Ingredients:
* 1 Cup Water
* 3 Tablespoons Whole Flaxseeds (Linseeds)
* 1 Tablespoon Rice Flour (or Cornstarch)

### 🌿 Quick Instructions:
1.  Boil water, flaxseeds, and rice flour.
2.  Stir continuously until it forms a thick, gelatinous paste (consistency shown in video).
3.  Cool completely. Apply thickly to face.
4.  Rinse off after 20-30 minutes for glowing, firm skin!

**➡️ Did you try this DIY face mask? Drop a comment below!**
👍 **Like and Subscribe for more easy natural skincare recipes and beauty hacks!**

#skincare #DIYMask #FlaxseedMask #NaturalBotox #KoreanSkincare #KBeauty #SkinWhitening #SkinFirming #AntiAgingTips #HomemadeSkincare #GlassSkin #RiceMask
    How to Make DIY Korean Flaxseed Mask for Skin Whitening (Natural Botox Effect!) #skincare
    Ultimate Blackhead Removal Hack! DIY Gelatin & Coffee Peel-Off Mask ☕️

Watch this satisfying mask detox your skin and remove blackheads, dead skin, and dirt! Get super smooth and fresh skin with this simple home remedy.

**✨ How to Make It:**
1. Scoop 1 part Gelatin, 1 part Coffee grounds, and a splash of Hot Water into a bowl.
2. Mix well until the gelatin dissolves and you have a thick, smooth paste.
3. Apply to your nose/t-zone and let it completely dry (about 15-20 minutes).
4. Slowly peel off the mask and see the results!

**⚠️ Note:** Always do a small patch test first. Do not use if you have sensitive or broken skin.

#shorts #blackheads #blackheadremoval #skincare #diyskincare #peeloffmask #satisfying #coffeemask #homeremedy #beautyhacks #skinroutine
    Ultimate Blackhead Removal Hack! DIY Gelatin & Coffee Peel Off Mask #skincare
    Load More... Subscribe
    Share. Facebook Twitter Pinterest LinkedIn Tumblr Email
    Hershey

    Hi, I’m Hershey — a lifelong natural skincare enthusiast with a love for creating simple, homemade beauty solutions that actually work. Inspired by my grandmother’s herbal remedies and my own sensitive skin journey, I started DIY Beauty Corner to share effective, affordable skincare recipes made from ingredients you already have at home.

    Related Posts

    DIY Vanilla and Brown Sugar Body Scrub Recipe

    August 6, 2025

    How to Make a DIY Yoni Oil for External Use

    July 30, 2025

    10 Easy Ways to Make Rosemary Water for Hair Growth (Benefits + How to Use)

    December 13, 2024

    Hi, I'm Hershey. I'm a skin care and beauty blogger who's NOT a morning person. (Seriously, who is?) I love making DIY skin care remedies from natural ingredients, and sharing my recipes and tips that can be used at home. Whether you're looking for ways to save money on your beauty routine, or just want to know how to take better care of your skin, you'll find something useful on my blog. So why not stick around for a while?

    Grandmas Homemade Face Mask Recipe

    Continue Reading
    DIY Beauty Corner

    Popular This Month

    • Sugar & Honey Body Scrub
    • Organic Body Butter
    • Korean Glass Skin Rice Mask
    • Turmeric Glow Body Scrub
    • Rosemary Hair Growth Oil
    • Quick Coffee Sugar Scrub
    • Vanilla & Brown Sugar Scrub
    • Pink Whipped Sugar Scrub
    • Non-Greasy Body Butter
    • Lemon Sugar Scrub

    Browse by DIY Recipe Type

    Body Scrub Recipes
    Face Mask Recipes
    Body Butter Recipes
    Hair Growth Recipes
    Lip Balm Recipes
    Perfume Recipes
    ⚠️ Please note: I’m not a licensed dermatologist or medical professional. All recipes shared are based on personal experience and research. Always perform a patch test before trying new skincare, and consult a healthcare provider for specific concerns.
    Pinterest YouTube
    • About
    • Contact
    • Disclaimer
    • Privacy Policy
    • Terms and Conditions
    © 2025 DIYBeautyCorner.com.

    Type above and press Enter to search. Press Esc to cancel.