A DIY pink whipped sugar scrub is a simple and enjoyable way to add a little luxury to your regular skincare routine. This soft, airy scrub combines gentle exfoliation with nourishing oils, helping your skin feel smoother and more comfortable after each use. With easy-to-find ingredients and a light whipped texture, this homemade whipped sugar scrub is perfect for everyday self-care.

Quick Recipe: Pink Whipped Sugar Scrub
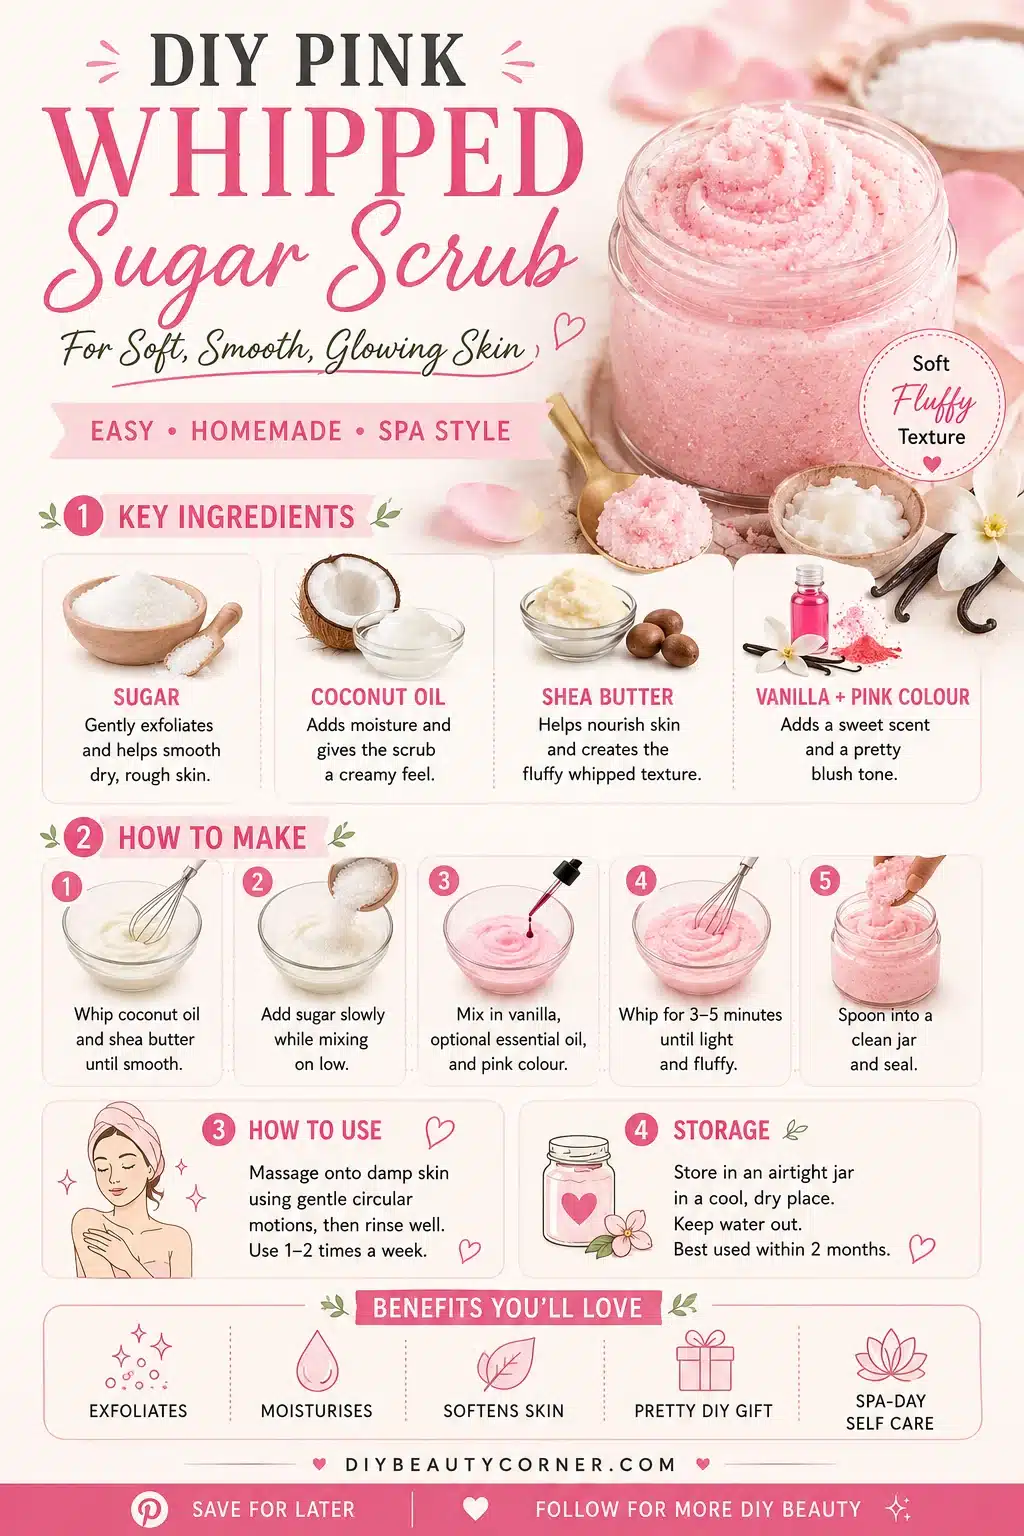
Ingredients
- 1 cup granulated sugarShop on Amazon
- ½ cup coconut oil (room temperature)Shop on Amazon
- ½ cup shea butterShop on Amazon
- 1 teaspoon vanilla extractShop on Amazon
- Optional: 5–10 drops essential oil (lavender, rose, vanilla, or citrus)Shop on Amazon
- Optional: natural pink colouring (beetroot powder or cosmetic pink mica)Shop on Amazon
Tools
- Hand mixer
- Mixing bowl and spatula
- Measuring cups/spoons
- Clean, airtight jar for storage
Steps
- In a mixing bowl, combine the coconut oil and shea butter. Whip with a hand mixer until smooth and creamy.
- Add the sugar slowly while mixing on low speed.
- Mix in vanilla extract, optional essential oil, and your chosen pink colouring until evenly combined.
- Increase speed to medium and whip 3–5 minutes until light and fluffy. Transfer to a clean jar and seal.
Shop the Ingredients
Shop the Tools
Unlike traditional scrubs, whipped sugar scrubs have a creamy, cloud-like consistency that spreads easily and feels gentle on the skin. The soft pink colour adds a playful touch, making this recipe especially popular for gifting, spa-style pamper days, or simply upgrading your shower routine.
In this guide, you’ll learn how to make your own pink whipped sugar scrub step by step. From selecting the right sugar and oils to whipping everything into a fluffy texture, this tutorial covers everything you need to create a beautiful homemade scrub you’ll love using.
Essential Ingredients for Your Pink Whipped Sugar Scrub

Choosing the right ingredients is key to creating a whipped sugar scrub that feels good on the skin and holds its fluffy texture. Each component plays a role in exfoliation, moisture, colour, and scent.
Selecting the Right Sugar
Fine granulated white sugar is ideal for whipped scrubs because it gently exfoliates without feeling harsh. For added texture, it can be combined with a small amount of coarser sugar. A balanced mix helps smooth the skin while keeping the scrub comfortable to use.
A common combination is ¼ cup white granulated sugar mixed with ¼ cup turbinado or raw sugar. Always use dry sugar to prevent clumping and maintain the scrub’s consistency.
Choosing a Nourishing Oil Base
The oil base adds moisture and gives the scrub its creamy texture. Coconut oil is a popular choice thanks to its smooth feel and versatility. Using it at room temperature helps achieve the whipped effect.
Shea butter can be added for extra richness. A blend of ¼ cup coconut oil and ⅓ cup shea butter creates a soft, spreadable base that holds its shape once whipped.
Natural Pink Colouring Options
Natural colourants can be used to give your scrub its pink shade. Beetroot powder is a popular option, producing a soft pink tone without synthetic dyes. Start with a small amount and adjust until you reach your desired colour.
Alternatively, cosmetic-grade mica or naturally tinted salts can be used for a subtle blush tone while keeping the scrub visually appealing.
Adding Fragrance
Fragrance enhances the overall experience of using a whipped sugar scrub. Essential oils such as lavender, rose, vanilla, or citrus blends work well. Typically, 5–10 drops of essential oil is enough for a gentle scent.
Always choose high-quality essential oils and avoid adding too much, as a light fragrance is more comfortable for regular use.
Step-by-Step Preparation Guide

Initial Mixing
Gather the following ingredients:
In a mixing bowl, combine the coconut oil and shea butter. Using a hand mixer, blend until smooth. Slowly add the sugar while mixing on low speed, followed by vanilla extract and colouring.
Whipping the Scrub
Increase the mixer speed to medium and whip for 3–5 minutes until the mixture becomes light and fluffy. Scrape down the sides of the bowl as needed to ensure even texture.
The finished scrub should resemble whipped frosting with a soft, pastel pink colour. Transfer to a clean jar and seal tightly.
Application and Storage Tips

How to Use
Apply the scrub to damp skin using gentle circular motions. Focus on areas that feel rough, then rinse thoroughly with warm water. Use once or twice a week for best results.
Storage
Store the scrub in an airtight container in a cool, dry place. Avoid introducing water into the jar to help maintain freshness. When stored correctly, the scrub can last up to two months.
Frequently Asked Questions
Can I use a whipped sugar scrub on sensitive skin?
For sensitive skin, use fine sugar and mild oils, and always patch test before full use.
Can I replace coconut oil?
Yes, sweet almond oil, grapeseed oil, or jojoba oil can be used as alternatives depending on your preference.
Why whip a sugar scrub?
Whipping introduces air, creating a lighter texture that spreads easily and feels softer on the skin.