One of the most enjoyable parts of DIY beauty is seeing your finished projects neatly stored and ready to use — whether that’s a single small jar on a shelf or a whole collection of small-batch creations organised in a drawer.
Because DIY beauty often overlaps with crafting and hobby-style projects, storage and organisation can make a big difference to how enjoyable the experience feels. A simple set-up helps keep supplies tidy, makes projects easier to return to, and supports a relaxed, creative routine. If you’re building your set-up from scratch, How to Create a Simple DIY Beauty Workspace at Home is a useful companion guide for choosing a practical space and keeping everything easy to reset.
Why Organisation Matters for DIY Beauty
DIY beauty can stay fun and low-stress when your ingredients, tools, and containers are easy to find. Organisation doesn’t need to be complicated — it’s simply about creating a system that works for your space and your project style.
Good organisation supports:
- Less mess and faster clean-up
- More enjoyable project sessions
- Consistent storage for jars, tins, and tools
- Easier planning for small-batch projects and gifting
Even a small storage solution can make DIY beauty feel more approachable.
Think in “Zones”: A Simple Way to Organise
A helpful approach is to organise DIY beauty supplies into a few simple zones. This keeps everything easy to manage and reduces the feeling of having “bits everywhere.”
| Zone | What It Includes | Why It Helps |
|---|---|---|
| Tools | Measuring spoons, spatulas, bowls, scales | Everything you reach for first is together |
| Containers | Jars, tins, lids, labels, gift boxes | Makes small-batch planning easier |
| Ingredients | Core DIY supplies stored neatly | Simple to browse and keep tidy |
| Finished Projects | Completed jars and small sets | Prevents clutter and improves presentation |
Zones are flexible — you can keep everything in one box, one drawer, or spread across shelves depending on your space.
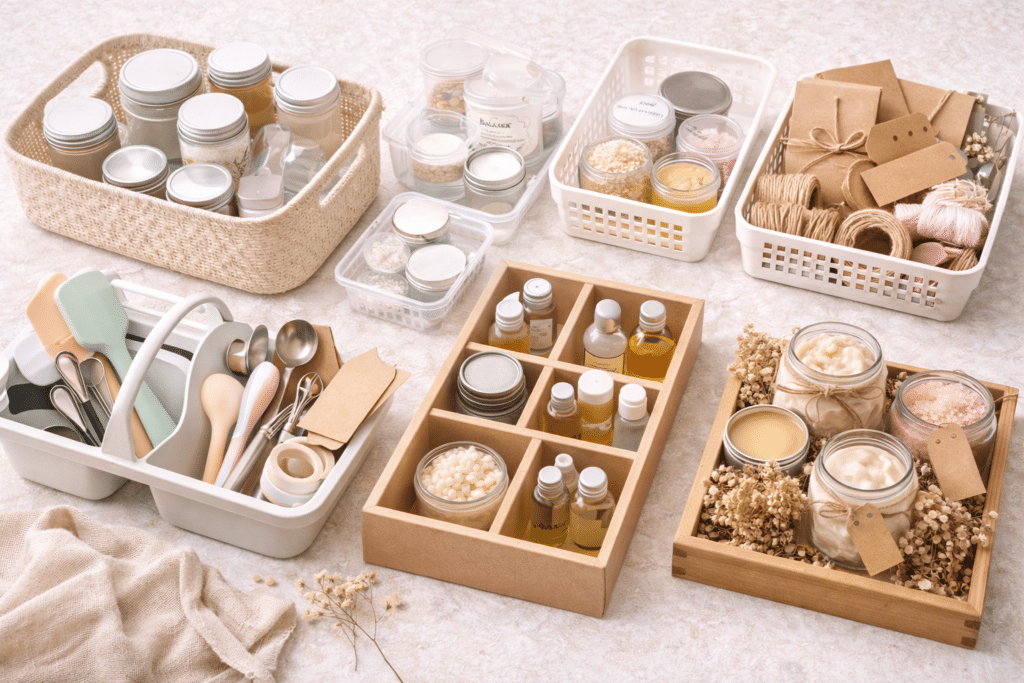
Storing Containers: Jars, Tins, and Bottles
Containers are often what DIY beauty creators collect the most. Storing them neatly helps prevent clutter and makes it easier to plan projects. Many people find it helpful to store containers by type and size.
Simple ways to store containers include:
- Small boxes or drawer dividers for tins
- Stackable bins for jars of similar sizes
- A dedicated shelf section for bottles
- Keeping lids together in one labelled container
When containers are easy to access, small-batch projects feel simpler to start.
Keeping Tools Together (So You Don’t Lose Them)
DIY beauty tools are usually small, which makes them easy to misplace. A basic tool organiser can make a big difference — even if it’s just one box kept in the same spot every time.
Many people store tools using:
- A small kitchen caddy or handled storage bin
- A drawer tray for measuring spoons and small tools
- A jar or pot for spatulas and brushes
- A “project kit” box that holds everything needed
The goal is simply to create a reliable place for tools so set-up and clean-up stays quick.
Ingredient Organisation (Simple, Not Overcomplicated)
Ingredient storage often works best when it stays simple. Many hobbyists like a “core ingredients” approach — keeping a small selection of commonly used items organised, rather than storing too much at once.
Common ingredient organisation habits include:
- Grouping ingredients by type (bases, texture, liquids)
- Using clear containers or labelled jars for visibility
- Keeping frequently used items at the front
- Storing occasional items separately to reduce clutter
This approach makes it easier to browse ideas and plan projects without feeling overwhelmed.
How to Store Finished DIY Beauty Creations
Finished DIY projects often look best when they’re stored with intention. This is especially useful if you enjoy taking photos, building gift sets, or keeping projects displayed. If you’re exploring DIY beauty as a long-term hobby, Why DIY Beauty Is a Creative Hobby explains why routines like storage, set-up, and presentation become part of the enjoyment over time.
Simple ways to store finished items include:
- A small “finished shelf” section in a cupboard or cabinet
- A basket or tray used as a display area
- A dedicated box for seasonal gifts
- Grouping similar-looking jars together for a tidy feel
If you enjoy the visual side of DIY beauty, storing finished projects neatly also makes them easier to photograph.
Organising DIY Beauty for Gifting
If you like making DIY beauty gifts, it helps to store gifting supplies together. This can include boxes, tags, tissue paper, ribbons, labels, and spare containers.
A simple “gift station” might include:
- Small gift boxes or hamper boxes
- Blank tags or cards
- Neutral wrapping materials
- Spare jars and matching lids
When gifting supplies are organised, it becomes much easier to create quick, cohesive gift sets.
A Simple Weekly Reset to Keep Things Tidy
DIY storage systems tend to work best when they’re easy to maintain. Many people keep things tidy with a simple weekly “reset” — a short routine that helps prevent supplies from building up in random places.
A quick reset can include:
- Putting tools back into the tool zone
- Restacking jars and tins neatly
- Clearing any loose bits from the workspace
- Refreshing a small “project kit” for the next idea
This keeps DIY beauty feeling calm and enjoyable rather than cluttered.
Final Thoughts
Storing and organising DIY beauty creations doesn’t need to be complicated. A simple system that separates tools, containers, ingredients, and finished projects can make DIY beauty feel easier, tidier, and more enjoyable as a long-term hobby.
Whether you store everything in a single box or create a dedicated shelf area, a little organisation goes a long way in keeping DIY beauty relaxed and inspiring.